Draggable Widget Layouts Using React.js
Jun 19, 2022
It is a common expectation for dashboards to have draggable widgets. In this article, we are going to see how we can make a draggable layout without using any libraries. We are going to use only React and CSS Grid and make something that looks like the following image.
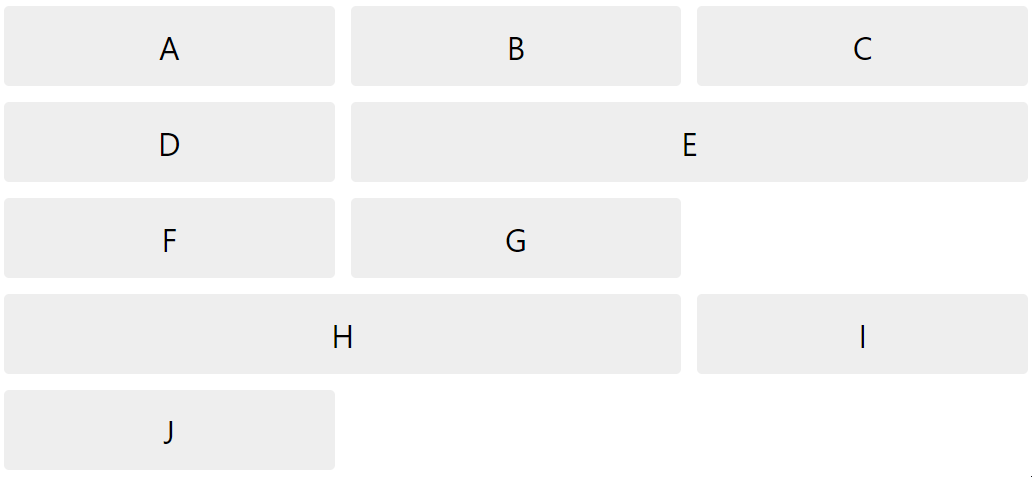
Actual problem which we are trying to address in this article is dragging and re-arranging the layout where each widget can take any number of columns as width. To simplify the demonstration I have used divs with text inside as widgets. But in real world, these widgets can be anything varying from texts to charts. Depending upon our needs, we have to create an array of objects which represent each widget.
const WIDGET_LIST = [
  { id: "a", content: "A", size: 1 },
  { id: "b", content: "B", size: 1 },
  { id: "c", content: "C", size: 1 },
  { id: "d", content: "D", size: 1 },
  { id: "e", content: "E", size: 2 },
  { id: "f", content: "F", size: 1 },
  { id: "g", content: "G", size: 1 },
  { id: "h", content: "H", size: 2 },
  { id: "i", content: "I", size: 1 },
  { id: "j", content: "J", size: 1 },
];
In our case, we are going to have a content property which is a string, it will be shown inside the widget. Depending on your requirement you can have even a component defined here. But you must have an id field which contains an unique id and a size field to specify how many columns that widget should take.
Now we are going to create two components named Widget and WidgetContainer. Each Widget will be contained within a WidgetContainer. Widgets are draggable and WidgetContainers act as the drop target.
function Widget({ content, onDragStart }) {
  return (
    <div
      style={{
        backgroundColor: "#eeeeee",
        borderRadius: "5px",
        minHeight: "5rem",
        display: "flex",
        justifyContent: "center",
        alignItems: "center",
        fontSize: "2rem",
      }}
      onDragStart={onDragStart}
      draggable
    >
      {content}
    </div>
  );
}
Widget adds a div as a wrapper around content, it has to be marked as draggable to notify browser that this item can be dragged. We are exposing the onDragStart event to the parent, so that the we can use this mark which Widget is being dragged. You will see that when we are making the final dashboard.
Let’s explore the WidgetContainer.
function WidgetContainer({
  onDrop,
  children,
  onDragEnter,
  onDragLeave,
  isDraggedOver,
  size,
}) {
  return (
    <div
      style={
        isDraggedOver
          ? {
              border: "dashed 2px #abcdef",
              borderRadius: "5px",
              minHeight: "5rem",
              boxSizing: "border-box",
              gridColumn: `span ${size}`,
            }
          : { gridColumn: `span ${size}` }
      }
      onDrop={onDrop}
      onDragEnter={onDragEnter}
      onDragLeave={onDragLeave}
      onDragOver={(e) => e.preventDefault()}
    >
      {!isDraggedOver && children}
    </div>
  );
}
Now this component does a little bit more. Let me list its functionalities.
- Display the Widget which is passed as a child to it
- If a widget is being dragged into this WidgetContainer then onDragEnter will be fired, which we can use to mark the
idof the drop target where the widget will be dropped - If we drag the element outside without dropping it,
onDragLeavewill be called which we can use to clear the marking we made ononDragEnter - Whenever something is dragged over this component, it changes the style and hides the content till its dropped or the mouse left the component
onDrop, as the name suggests, is triggered on dropping a widget into this container.- It is very important to prevent the default behavior of
onDragOverevent to enable dropping into the WidgetContainer
All we need is to integrate these to components with some state, and re-arrange the list of widgets whenever onDragStart, onDragEnter and onDrop events are called. Let’s do that in the Dashboard component.
export function Dashboard() {
  const [widgets, setWidgets] = useState(WIDGET_LIST);
  const [draggedItemId, setDraggedItemId] = useState(null);
  const [draggedOverContainerId, setDraggedOverContainerId] = useState(null);

  const handleDragStart = (id) => setDraggedItemId(id);
  const handleDragEntered = (id) => setDraggedOverContainerId(id);
  const handleDragLeave = () => setDraggedOverContainerId(null);

  const handleDrop = () => {
    if (!draggedOverContainerId) {
      clearState();
      return;
    }

    const fromIndex = widgets.findIndex((w) => w.id === draggedItemId);
    const toIndex = widgets.findIndex((w) => w.id === draggedOverContainerId);
    setWidgets((w) => moveItem(w, fromIndex, toIndex));

    clearState();
  };

  const clearState = () => {
    setDraggedItemId(null);
    setDraggedOverContainerId(null);
  };

  return (
    <div
      style={{
        display: "grid",
        gridTemplateColumns: "1fr 1fr 1fr",
        gridGap: "1rem",
      }}
    >
      {widgets.map((w, i) => (
        <WidgetContainer
          key={w.id}
          onDrop={handleDrop}
          onDragEnter={() => handleDragEntered(w.id)}
          onDragLeave={handleDragLeave}
          isDraggedOver={w.id === draggedOverContainerId}
          size={w.size}
        >
          <Widget
            content={w.content}
            onDragStart={() => handleDragStart(w.id)}
          />
        </WidgetContainer>
      ))}
    </div>
  );
}
Dashboard renders a CSS Grid, with a list of WidgetContainers as its children, each having one Widget as its child. We have designed the dashboard as a 3 column layout and CSS Grid takes care of placing the widgets accordingly.
If you notice the WidgetContainer component, we have set the gridColumn property with span ${size} so that the container automatically takes the width accordingly.
We need three state variables.
widgets- to hold the list of widgets in the right sequential orderdraggedItemId- ID of the widget which is being draggeddraggedOverContainerId- ID of the container over which a widget is being dragged
When onDragStart is triggered by Widget, we set the id of the widget which is being dragged into the draggedItemId, and when onDragEnter of WidgetContainer is called, we set the id of the container over which an item is dragged. If we have these two values, we can re-arrange the list of widgets whenever onDrop is called. Following is a simple function which re-arranges the list if we pass the indices of from and to.
export function moveItem(list, from, to) {
  const listClone = [...list];
  if (from < to) {
    listClone.splice(to + 1, 0, listClone[from]);
    listClone.splice(from, 1);
  } else if (to < from) {
    listClone.splice(to, 0, listClone[from]);
    listClone.splice(from + 1, 1);
  }
  return listClone;
}
We simply call moveItem on handleDrop to re-arrange the widgets set it back to the state widgets, so that the screen is updated on the next render.
You can find the code for this at Github
Now this is a simplified version. In reality, each of your Widget will contain a component which will render different charts or content. And you will be having a title bar or a drag handle using which the Widget will be dragged. This can be implemented by modifying the Widget component without touching other parts. You can see my sample code at this branch to get some idea on how to implement that.